GAL/PAL Programming

A potentially lost art from the the early days of Microprocessor based computers.

What is it?

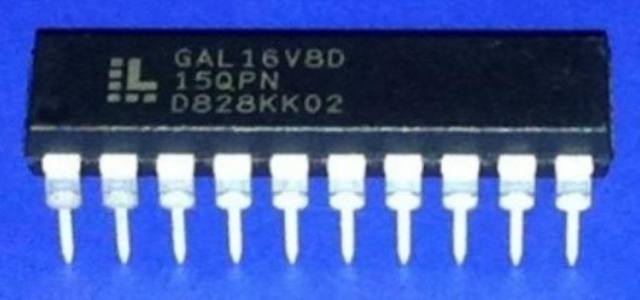
A PAL or GAL is a type of programmable logic gate chip whose basic design goal is to reduce the number of chips on a printed circuit board by allowing a designer to add truth tables to a single chip, thus reducing chip count.


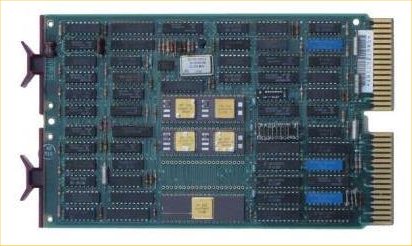
Typical board from the 70’s/80’s era… with lots of TTL Logic ‘glue’.

Boards can be made much smaller, or more dense by reducing the number of ‘black box’ types. In many cases, each of the smaller IC’s on the board above has a dedicated logic function that they offer one or more of. Basically, each chip is designed to perform one type of function.

The PAL, or Programmable Array Logic, and GAL, or Generic Logic Array, are one-time and multi-use re-programmable logic IC that replaces many of these chips on the board. By allowing the logic decisions between inputs and outputs to be customized as needed, these devices are generically called “Programmable Logic Devices, or PLD’s.

By today’s standards, these devices are obsolete as new devices have superseded them far more features and with pins numbering into the hundreds. The Complex PLD (CPLD) is well beyond what will be discussed here. They are programmed in an entirely different way than the legacy PLD devices. PLD’s are programmed in a way very similar to EPROMS and as a result, devices like the affordable TL866 programmer can be used to prepare them.

Pin Assignments in the GAL16V8 – LEFT SIDE are inputs, RIGHT SIDE is outputs

So, how would you use one of these? We can look at an example of where we can replace a few logic IC’s with a single chip. A good example is Grant Searle’s Z80 design. http://searle.hostei.com/grant/z80/SimpleZ80_32K.html

On the web page, there is a diagram of a small but complete Z80 based system. Some logic is used to route memory reads and writes as well as ROM address decoding and such.

I’m talking about replacing U5 and U7 with a single chip. Keep in mind this is an exercise and was picked because it should be pretty easy.

So, if we look at what the chip is doing and how we can apply it to PLD design file… lets examine whats happening.

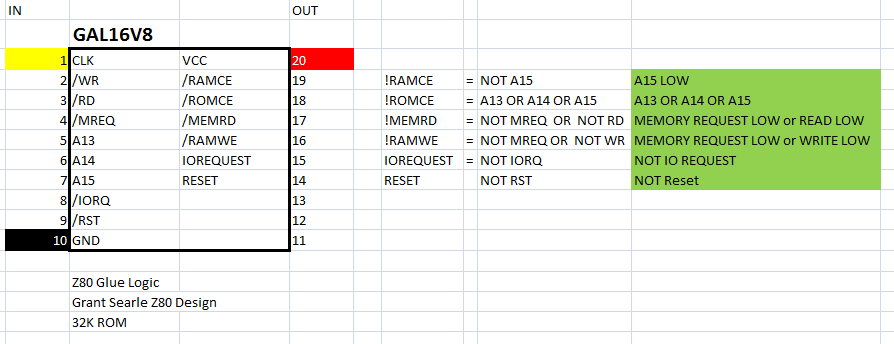
If you look at the equations on the right, you can see that this is what the 2 chips are accomplishing. (Ignore the system clock portion of U5) By carefully examining the logic of the wiring… this is what we ended up with.

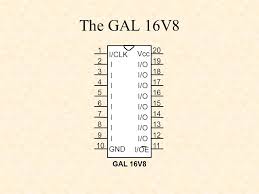
The nest step is to match the Inputs and Output pins to Names that are used in the equations.

The final step is to add the logic (far right column) equations into the programming file.

The resulting file looks like this:

Name     Z80MemDecode ;
PartNo   00 ;
Date     12/27/2018 ;
Revision 01 ;
Designer Pete Willard ;
Company  Personal ;
Assembly None ;
Location  ;
Device   G16V8 ;

/* *************** INPUT PINS *********************/
PIN 2   = !WR                     ; /*   WRITE                         */ 
PIN 3   = !RD                     ; /*   READ                          */ 
PIN 4   = !MREQ                   ; /*   MEMORY REQUEST                */ 
PIN 5   = A13                     ; /*   ADDRESS                       */ 
PIN 6   = A14                     ; /*   ..                            */ 
PIN 7   = A15                     ; /*   ..                            */ 
PIN 8   = !IORQ                   ; /*   INPUT OUTPUT REQUEST          */ 
PIN 9   = !RST                    ; /*   RESET                         */ 

/* *************** OUTPUT PINS *********************/
PIN 19  = !RAMCE                  ; /*  RAM Chip Enable                */ 
PIN 18  = !ROMCE                  ; /*  ROM Chip Enable                */ 
PIN 17  = !MEMRD                  ; /*  Memory  Read                   */ 
PIN 16  = !RAMWE                  ; /*  RAM Write                      */ 
PIN 15  = IOREQUEST               ; /*                                 */ 
PIN 14  = RESET                   ; /*                                 */ 

/* *************** LOGIC EQU  *********************/
RAMCE       = !A15                 ; /*                                 */ 
ROMCE       = A13 # A14 # A15      ; /*                                 */ 
MEMRD       = MREQ # RD            ; /*                                 */ 
RAMWE       = MREQ # WR            ; /*                                 */ 
IOREQUEST   = !IORQ                ; /*                                 */ 
RESET       = !RST                 ; /*                                 */ 


In order to program a GAL the source file (“.pld”) must be transformed into a JEDEC file. The resulting JEDEC file uses the filename suffix of JED. This is the file that is used by the TL866 Programmer to prepare the device according to our design.

The editor used to create the specification (PLD) and JED file is called WINCUPL, which is a free tool made a available by ATMEL and still offered by the company acquired ATMEL, Microchip.

Here is the link: https://www.microchip.com/design-centers/programmable-logic/spld-cpld/tools/software/wincupl

So… DID IT WORK? Nope !

It turns out… WINCUPL has issues with NEGATIVE OUTPUT LOGIC in equations. So… back to the drawing board… I’ll provide a fix later…

Using PiPDP8 with a terminal

  1. Copy the file serial-getty@.service from /lib/systemd/system to /etc/systemd/system

  2. The file must be renamed, so that it points to your serial terminal which will be ttyUSB0. The filename becomes:
    serial-getty@ttyUSB0.service

  3. The file may need to be edited with the parameters of your serial terminal, or the default setting may work.
    In my case I changed the first line in the [Service] section to read: ExecStart=-/sbin/agetty ttyUSB0 9600 vt100

  4. Now, enable the service with:

sudo systemctl enable serial-getty@ttyUSB0.service

You should get a Creating sim link …​. message. The service will now start up at every boot.

Note
The serial-getty@service file is a generic template for setting up a serial terminal with a log-in prompt.


Blast from the past: Arduino Origins

Someone in the Arduino forums mentioned they were having troubles with their Single Sided Arduino board that they built on their own.   It reminded me that I wanted to make one for myself.  I needed an extra Arduino I could use for RS485 testing and a NON-USB one was preferred.

What a great afternoon project this is.  I took the toner transfer PNG file and printed it out so I could use the laminator to do a toner transfer. Once it was etched I could really see the benefit of having a silkscreen on the topside… the trouble is, I’ve never done a board with imagerey on top.   I first tried using a heat transfer…  just like I did with the copper side but I had no luck.  After 10 times through the laminator I still had no luck bonding the toner with the fiberglass side.  (I sort of figured that would happen…)

I remembered that I had some 8 1/2 by 11 blank decal sheet on hand and thought maybe I could float the silk screen  side decal onto the surface.   OK… having never done this  before I’m going to now admit I was a bit overconfident,  this is really not easy.

Eventually I got it applied.  I lost a few bits here and there, but the important parts didn’t tear off.  I wanted to coat the decal with FUTURE floor wax but I could not locate the bottle I had for this purpose.  It would be a good idea though.

Anyway… here are the results.  Powered it up and loaded a sketch…  Yippie.

Windows likes to hide behind a curtain.

Sometimes it becomes very clear to me that the early Windows Developer approach to gaining market share was to hide the tricky stuff behind curtains. It makes me think of the wizard in OZ from the movie where he yells into the microphone, “Pay no attention to that man behind the curtain!”

So what am I talking about?

Well, when I plug a new USB Serial adapter into a generic Linux workstation, I can usually type something simple like:

ls /dev/tty*

… and BAM, I have nice list of my serial ports, including the one I just plugged in, be it ttyUSB0 or ttyACM0.

If I need more details, I can use:

lsusb

… and be inundated with more information about what is attached than I ever wanted.

So I started looking for a commend line version of this for Windows. (You know the answer) There isn’t one.

Sure, I can use START–> Control Panel –> System and Security –> System –>Device Manager and select “PORTS” but c’mon. This is where Windows so often fails. You can get what you want, provided you don’t mind clicking your way through a few Windows Gui screens.

Working with Arduino (I’m including all similar devices here too) and attaching or detaching the many varied devices can have you grow tired of this game. I really wanted a commend line option.

Now, I will state that I know that the general opinion about using command line on Windows,  I’m using Windows 7 in my case, is less than fun.  Microsoft did make it better with the addition of PowerShell though. Even with the older and limited version of PowerShell that comes default with Windows 7 can be pretty useful.

So, lets get down to the code. What I wanted was a way to know which Comports my system currently saw as being active.

The code to get the current list is actually pretty simple:

$COMportList = [System.IO.Ports.SerialPort]::getportnames()

Write-Host "Active Serial Port List:"
ForEach ($COMport in $COMportList) {
$temp = new-object System.IO.Ports.SerialPort $COMport
Write-Host (" * " +$temp.PortName) -nonewline
Write-Host (" @ " +$temp.BaudRate) -nonewline
Write-Host " Baud"
$temp.Dispose()
}


I named this comports.ps1 and you can run it, provided you are IN the PowerShell command window.

To make this even more handy, you can download a utility called PS2EXE from Technet that lets you convert Powershell scripts into executable files.

Powershell to EXE

Its really easy to use and when you are done, you have a nice local executable tool to get a list of active com ports:

Open your command line, run Comports and there you go:

Active Serial Port List:
* COM1 @ 9600 Baud
* COM31 @ 9600 Baud
* COM32 @ 9600 Baud

Note: FTDI used to have a Windows Gadget to show active com ports, but of course, it only worked on FTDI adapters. Thanks but no thanks.

Digital PDP-8/I – continued – Emulating in SIMH

===============================================

DIGITAL PDP8/I Continued
===============================================

I actually use my own real VT220 to communicate with my PiDP-8 emulator

As mentioned in a previous post, this family of devices was used in many of the in-house test systems for the central incoming test group also located in our building as well as some of the newer PDP-11 series devices.

It has a very small instruction set and a word size of 12 bits. First devices where delivered with 4K words that could be extended to 32K words using an extension board in the integrated circuit models.

These devices supported ASR33 ‘typewriters’ that also supported paper tape for entering and saving code. There were also TU56 tape (184K) drives which essentially worked more like random access disk drives than what we traditionally think of as tape drives. There was also disturbingly large disk drives with seriously small storage space (less than 3Mb). Later in the series, there was also an 8″ floppy called the RX01, which I personally encountered on the WT78 Word Processor while doing my college homework (with permission… after hours at the office). A slightly larger storage capacity 8″ RX02 arrived the same year.

Configuring a PDP-8 in SIMH

The environment I’m using is based on Oscar Vermeulen’s Pidp8 (a Raspberry Pi Zero with with switches and led’s emulating a PDP-8 front panel). Oscar assembled a custom release of SIMH 4.0 including a GPIO handler to drive the LEDS and read the front panel switches for a full retro-experience.

There is a website that stores many PDP-8 device images that can be used with the SIMH/PDP8 emulator. They are found here, pdp8 online

Examples:

$wget http://www.pdp8online.com/ftp/images/misc_floppy/os8_v3d_bin_1.rx01
$wget http://www.pdp8online.com/ftp/images/misc_floppy/os8_v3d_bin_2.rx01

Using the PiDP-8/I front panel

If it’s not clear, when the top of the switches on the panel are pressed IN, the switch is in a “0” state, and when the bottom of the switch is pressed in it represents a “1” state.

PiDP-8/I Simulator

I have a brief but ancient history with the PDP-8 from Digital Equipment Corporation. I started working for DEC in the winter of 1977/78, just after my senior year in high school. I was in college studying radio/television production. When a film crew arrived one day to make a training video for the company, I asked if I could intern on the project. I’d worked there a while by then and had a good relationship with my boss, so I got a green light to do it.

The training video project was for a dedicated bed-of-nails tester for the new PDP-11/23 board that was about to go from prototype assembly to full production in Puerto Rico. The facility that I worked at performed central incoming chip testing as well as the prototype assembly process for the PDP-11/23. All of the test equipment was driven by DEC PDP computers, which was pretty impressive.

The test machine we were making a video for had a massive amount of input/output pins that were controlled by the PDP-8. It had a paper tape reader, an RK08, a console terminal interface and an expansion chassis that led to the 3rd-party I/O pin controllers and timing hardware. The bed of nails fixture was built specifically for the PDP-11/23 and used sharp spring loaded pogo pins for connectivity to all the “special places” to be probed on the underside of the board.

In the training video, I showed how to perform the boot process, that involved loading a series of commands into the front panel in octal. These steps told the machine how to read the paper tape. The next step was to run what the paper tape loaded (The tape drive), which was the program that knew how to spin up and use the RK08 disk and make the serial terminal work. From there, the text application could be executed from the operator terminal.

So where is all this leading?

I just purchased a kit from Oskar Vermeulen called PiDP-8, a PDP-8/I simulation with real front panel switches and blinken lights. Yes, Blinken does mean “to flash” in German. The kit is based on a Raspberry Pi and uses the SIMH computer simulation program.

pidp8PDP

His website is at Obsolescence Guaranteed

I’m still waiting for the kit to arrive… but I have the PI running.

Screenshot 2016-04-26 20.11.40

Arduino IDE on Ubuntu – easy way

Here is the simplest way to get the latest Arduino IDE installed on a freshly installed  Linux Ubuntu distribution.  The version of Arduino that is in the default repository is now a few years old, and in fact, the version you will get is officially “…no longer supported by the development team.”

But, there is an upside to this.  By performing the following command you get a complete guided installation that will install all the compiler dependencies and do nice things such as making your account part of the dialout group, which is needed to access the serial port.


sudo apt-get install arduino

So, with this accomplished lets download the latest version from
Arduino Download Page and make sure you choose the linux version that matches your system (32 bit or 64 bit).

Version

NOTE: The latest version is subject to change, so replace references to “1.6.8” with what ever the current downloadable version is.

The installation kit will normally end up in your “Downloads folder” so lets open a terminal window and go there to unpack it.


$ cd Downloads/
$ ls
arduino-1.6.8-linux64.tar.xz
$ tar -xvf arduino-1.6.8-linux64.tar.xz

This will place the files in a new folder named: arduino-1.6.8

Now, we can place it anywhere, but a nice place to put it is in the /opt top level folder. This can be accomplished with the following step:


sudo mv arduino-1.6.8 /opt

Now, move your /opt folder by typing:


cd /opt/arduino-1.6.8

and then issuing the following command to make this installation of arduino “go live”


chmod +x install.sh
./install.sh

You should now have an Arduino icon on your desktop that will open the latest “supported” version of the IDE.

An approach to writing Arduino code

Code Review

Let’s do an example of code development.

Let’s say that we are reading analog values for ranges and want to make decisions based on ranges to set ranges of values. We start with the following snippet. The `if` statements quickly become wordy and program flow maybe starts to become unclear.  So lets look at some ways to unravel this with a subroutine.


reading = analogRead(1);

int state = 0;

if (reading > 0 && reading < 500){ 
state = 1; 
} 

if( reading > 499 && reading < 700) { 
state = 2; 
} 

if ( reading > 699  && reading < 1025) {
 state = 3;
}

You could just write a small procedure  to simplify this comparison test series…


bool inRange(int x, int y, int z){

 if (x => y && x <= z) {
      return true;
     } else {
      return false;
     }
}

and then call it with much easier to read process requests… like the following code.


//file inrange.ino

// State 1: Connect analog pin to gnd
// State 2: Connect analog pin to 3.3V
// State 3: connect analog pin to 5V

int reading;
int state = 0;

void setup() {
  // put your setup code here, to run once:
 Serial.begin(9600);
}

void loop() {
  // put your main code here, to run repeatedly:
reading =  analogRead(1);

  if(inRange(reading,0,500))
     state = 1;
  
    if(inRange(reading,500,700))
       state = 2;
    
      if(inRange(reading,700,1024))
         state = 3;
      
    Serial.print("Reading ");
    Serial.println(reading);
    Serial.print("state: ");
    Serial.println(state);
    delay(1000);
}

//-------------------------------------------------
// Notice the use of non-informative variable names
// we should fix this.

int inRange(int x, int y, int z){
   bool val;
   if (x >= y && x <= z) {
      val =  true;
    } else {
      val = false;
    }

    return(val);
  }


See? You really get some better logic flow this way.

New lets go a step further… using space saving `const` or constants.


// File: inrange1.ino

// State 1: Connect analog pin to gnd
// State 2: Connect analog pin to 3.3V
// State 3: connect analog pin to 5V

//=====[ CONSTANTS ]============================================================
//Still a bit wordy here...
const int RED = 0;
const int GREEN = 1;
const int BLUE = 2;

//=====[ PINS ]=================================================================
int anPin = 1;


//=====[ VARIABLES ]============================================================
int reading;
int state = 0;


void setup() {
  Serial.begin(9600);
  // Wait for USB on Leonardo and similar devices
  while (!Serial) {
  }

}

void loop() {
  reading =  analogRead(anPin);
  
  // debugging code...
  Serial.print("Reading ");
  Serial.println(reading);


  if (inRange(reading, 0, 499)) 
    state = RED; 
    
  if (inRange(reading, 500, 699)) 
    state = GREEN;
  
  if (inRange(reading, 700, 1024)) 
    state = BLUE;
    
  ColorState();

  delay(1000);
}

//==============================================================================

int inRange(int passVal, int minVal, int maxVal) {

  if (passVal >= minVal && passVal <= maxVal) {
    return true;
  } else {
    return false;
  }
}
//==============================================================================

void ColorState() {
  Serial.print("State: ");

  switch (state) {
    case RED:
      Serial.println("Red");
      break;
    case GREEN:
      Serial.println("Green");
      break;
    case BLUE:
      Serial.println("Blue");
      break;
    default:
      break;

  }
}

Now we start to see how to break out sections of code into useful re-usable subroutines. So lets take this one step further and refine it into a final version using the `enum` command. Notice how the code becomes even a tiny bit simpler.


// File: inrange3.ino

// State 1: Connect analog pin to gnd
// State 2: Connect analog pin to 3.3V
// State 3: connect analog pin to 5V


enum States {
  RED,
  GREEN,
  BLUE
};

States state = RED;  // use the enumeration and initialize to RED

//=====[ PINS ]=================================================================
int anPin = 1;


//=====[ VARIABLES ]============================================================
int reading;

void setup() {
  Serial.begin(9600);
  // Wait for USB on Leonardo and similar devices
  while (!Serial) {
  }

}

void loop() {
  reading =  analogRead(anPin);

  if (inRange(reading, 0, 499))
    state = RED;

  if (inRange(reading, 500, 699))
    state = GREEN;

  if (inRange(reading, 700, 1024))
    state = BLUE;

  ColorState(state);

  delay(1000);
}

//==============================================================================

int inRange(int passVal, int minVal, int maxVal) {

  if (passVal >= minVal && passVal <= maxVal) {
    return true;
  } else {
    return false;
  }
}

//==============================================================================

void ColorState(int range) {
  Serial.print("Condition: ");

  switch (range) {
    case RED:
      Serial.println(" Red");
      break;
    case GREEN:
      Serial.println(" Green");
      break;
    case BLUE:
      Serial.println(" Blue");
      break;
    default:
      break;

  }
}


So while this is not the best code, it definitely accomplishes the simplification goal in the main process loop.

Food for thought.

Raspberry Pi – Node.js – Mongodb recipe

Node.js with Mongodb build

Post install cleanup


sudo apt-get update
sudo apt-get remove --purge wolfram-engine
sudo apt-get remove --purge minecraft-pi python-minecraftpi
sudo apt-get remove --purge penguinspuzzle
sudo apt-get remove --purge scratch nuscratch sonic-pi

Remote Access with VNC

sudo apt-get install tightvncserver

Setup password…

vncserver -geometry 1024x728 -depth 24 -dpi 120

Kill the server in preparation for boot automation…

vncserver -kill :1

Setup the autostart init.d based file in `/etc/init.d`

sudo nano /etc/init.d/vncserver

File contents:

#!/bin/sh
### BEGIN INIT INFO
# Provides: VNC
# Required-Start: $local_fs
# Required-Stop:
# Default-Start: 2 3 4 5
# Default-Stop: 0 1 6
# Short-Description: Start or stop the VNC server
### END INIT INFO

PATH=/sbin:/usr/sbin:/bin:/usr/bin

eval cd ~pi

case “$1” in
start)
su pi -c “/usr/bin/vncserver :1 -geometry 1024×728 -depth 24”
echo “Started VNC server.”
;;
stop)
su pi -c “/usr/bin/vncserver -kill :1”
echo “Stopped VNC server.”
;;
*)
echo “Usage: vncserver [start|stop]” >&2
exit 3
;;
esac

exit 0

The following commands will set up the new file so it will operate correctly…

sudo chown root:root /etc/init.d/vncserver
sudo chmod 755 /etc/init.d/vncserver
sudo update-rc.d vncserver defaults

Now we need to add cut/paste support…

sudo apt-get install autocutsel

and add it to the VNC startup file in the PI user account…

sudo nano .vnc/xstartup

so it looks like this:


#!/bin/sh
autocutsel -s CLIPBOARD -fork
autocutsel -s PRIMARY -fork
xrdb $HOME/.Xresources
xsetroot -solid grey

#x-terminal-emulator -geometry 80x24+10+10 -ls -title "$VNCDESKTOP Desktop" &
#x-window-manager &
# Fix to make GNOME work
export XKL_XMODMAP_DISABLE=1
/etc/X11/Xsession

Installing Nodejs dependencies:

build-essential and git

sudo apt-get install build-essential git

Node.js

wget http://node-arm.herokuapp.com/node_latest_armhf.deb sudo dpkg -i node_latest_armhf.deb

MongoDB

git clone https://github.com/svvitale/mongo4pi.git cd mongo4pi sudo ./install.sh

Arduino rant

Programming Framework

This post is about coding as much for yourself as for others. While it’s really easy to write pages of code with only a few comments, in the long run, writing well structured and clearly legible code helps a lot when you return to it months later and are forced to ask yourself “What was I thinking?”

Programmers Lament: ‘I think I wrote this section of code late at night after I had a few beers with friends. I think I need to go out and have a few beers to understand why I wrote it like this.’

I try to write all my code as if I was about to post it to public blog and that the reader will have only rudimentary knowledge of what my goal is. This means that I will need to explain myself clearly. This will impact the kind of comments I write and will remind me that resorting to cute code tricks and obfuscation (even accidental) is a bad idea.

I will admit that I am not a professional programmer, but I play one on IRC. Joking aside, I am not even a trained programmer unless you count reading books on programming. My advice here comes from concepts I have learned through years of reading other peoples code. I have found that what I call the “good” code is written by someone who is well organized writes decent comments and is reasonably methodical in how they break down a problem. Some of my own ideas start as inspiration from these organized and creative programmers whose shoulders I stand on. I will show you a programming template technique I learned from Jon McPhalen. See what I did there? Programming rule #1 should be, “Always include attribution and give appropriate credit for your borrowed ideas”.

While there are some decent books on programming style, it’s not the main focus here. This is about remembering that you could have a future audience that reads your code, so writing efficiently, being consistent and adopting good conventions is paramount.

Using a template for organized code

The Arduino environment already enforces a certain method of coding on us. It requires us to write using the core C++ language and that we employ two sections of functionality in our code. So the base minimum code is the well understood:

void Setup() {

} 

void Loop() {

}

While it is nice that the Arduino developers have saved us a lot of trouble but making “getting started” so easy, it doesn’t much help when you come back later to revise your code later and are clueless because you thought, “I’ll make it pretty later” and you never do. I have adopted a starting point for code that includes some more information than just the bare minimum required. The goal here is to start with a template that is nicely sectioned out so you have a road map for moving forward.


Here is an example of a template as a starting point:

//==============================================================================
// TTTTT EEEEE M   M PPPP  L      AAA  TTTTT EEEEE        III  N   N OOOOO 
//   T   E     MM MM P   P L     A   A   T   E             I   NN  N O   O 
//   T   EEEE  M M M PPPP  L     AAAAA   T   EEEE          I   N N N O   O 
//   T   E     M M M P     L     A   A   T   E      ..     I   N  NN O   O 
//   T   EEEEE M   M P     LLLLL A   A   T   EEEEE  ..    III  N   N OOOOO 
//==============================================================================
//==============================================================================
// Program: template.ino
// Author: Pete Willard
// Version: 1.0
// Target: Uno
// Date: 2015/04/02
// Time: 06:41:02
// Notes:
//
// ----------------------------------------------------------------------------
// 'THE BEER-WARE LICENSE':
// petewillard@gmail.com: As long As you retain this notice you
// can do whatever you want With this stuff. If we meet some day, And you think
// this stuff is worth it, you can buy me a beer in return. Pete Willard
// ----------------------------------------------------------------------------
//
// Reference:
//==============================================================================

//=====[ INCLUDE ]==============================================================

//=====[ CONSTANTS ]============================================================
#define DEBUG 1 // 0 = debugging disabled, 1 = enabled

//=====[ PINS ]=================================================================
int onboardLed = 13;

//=====[ SETUP ]================================================================
// Runs only one time at startup
void Setup() {
pinMode(onboardLed,OUTPUT);

}

//=====[ MAIN PROCESS LOOP ]====================================================
void Loop() {

}

//=====[ SUBROUTINES ]==========================================================
void printBreak() {
Serial.println("=============================");
}


I actually went so far as to write a small program that uses a fill in form to create this template format on demand. It even creates that retro-style banner with the file name spelled out on top.

A quick review shows that the template has defined a sample constant that you can use while debugging code. Changing this constant between 0 and 1 will enable you to write some conditional code that will print or stop printing debugging data with just 1 edit.

It also contains an example of using meaningful names. Using the variable assignment such as ‘onboardLed’ for pin 13 helps to make the code more readable.

Variable names don’t have to be short and are much better when multiple words are compounded into a meaningful descriptive names. For enhanced readability, try to avoid using using ALLCAPS and avoid variables with leading underscores. Try to adopt the much more accepted “camelBack” notation. This notation starts with lowercase and is the practice of writing compound words or phrases such that each following word or abbreviation begins with a capital letter*. Inserting underscores inside variable names makes the camelBack method redundant so just pick either one and stick with it.

* The case where the leading letter is lowercase but all subsequent words are capitalized is also called the Microsoft style.

Modular thinking

To me, when it comes to reading other peoples code, there is nothing more disturbing than reading page full of if conditional statements that include redundancies and a clear sign of poor planning. If I need to keep track of more than a few conditions while reading code I find that the logic of what “was intended” to be easily lost.

My approach to solving this has always been to create function blocks of code and keep the main section, in our case the Loop(), as clear and readable as possible. In C, this is called creating a “function” and it is sometimes referred to as a procedure or subroutine. I personally use all three terms interchangeably.

In most cases, you will write a procedure that accepts an argument and returns a result but this is not a requirement. For example, you can have a subroutine that just performs a task that makes the rest of your code look cleaner. Like this:

void printBreak() {
  Serial.println("=============================");
} 

So in your main code, all you need to type is:

printBreak();

In one of my programs, I have a Loop() section that basically contains 3 steps:

sampleSensors();	// collect all external sensor variable data into a “struct” variable</span>
printResults();	// send the results in 1 CSV formatted line</span>
cycleCheck();		// is it time to get updates from sensors?</span>

The functionality of the loop section remains readable and it is not bogged down with actual logic decisions. The logic and action steps are reserved for the procedures themselves and the procedures call other procedures to keep things organized. Breaking up tasks will actually help make your procedures more useful and in a lot of cases… re-usable.