Monthly Archives: January 2013

PD2435 and Arduino using I2C Port Expander

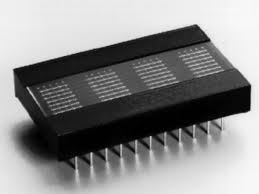
This information has been collecting dust on my hard drive.   Time to resurrect it…  Recently I have been working on a Temperature and  Humidity display and while working on it,  decided to use these RETRO parts I got from BGMICRO sometime around 2000. Even then, these parts were considered “pure unobtanium”.  I still had a few leftover displays, so out from the parts collection they come.

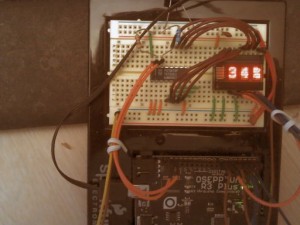
Now I had never taken the time to really get these displays working on an Arduino and what I really wanted was a test that would show off how much information you can really show using only 4 characters.

Since this project was to be inserted into an already working sketch, I made sure it was as modular as possible, sprinkled with subroutines that could be called from “who knows where” to get the job done.

I’ve tried to comment where it made sense and I have drawn up a quick schematic drawing to show just how its connected.  Since this part was designed for a CPU Bus Architecture of the 70’s and 80’s, it is annoying to see how demanding it is of the limited pin resources on the Arduino. The display assumes you provide data in a Parallel 8-bit format.  To relax this demand for pins, I employed a PCF8574 ( I2C port expander) that was harvested from some abandoned electronic board.  “YAY for recycling!”

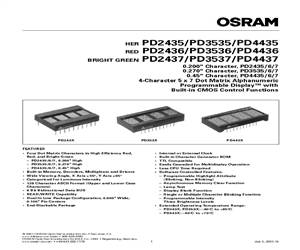
The parts I’m talking about are the PD243x displays from OSRAM.

So, what we have here is some sample code, for the Arduino, that allows you to send ASCII strings (including text scrolling) to these vintage displays.  Some of the information that helped me get beyond the datasheet was gathered from around the Internet (including blogs in New York, Japan and Korea)  Kudo’s to TechBlog in Korea for creating such a great resource.

display

Interesting side story: WAY BACK WHEN… BG Micro had horrible 3rd party photocopies of a facsimile for these parts. They were almost entirely unreadable.  At the time, datasheets were generally unavailable on the Internet,  so, after spending hours searching with “Altavista”, I finally found a clean PDF copy of the datasheet. Rather than just keep them to myself, I decided to give a nice clean datasheet back to BG Micro so they could share it with other customers who purchased the parts.

PD2435 PD24xx

DATASHEET

APPNOTE

CODE-DOWNLOAD

SCHEMATIC

CODE

//==============================================================================
// PPPP  DDDD  2222  4  4  3333  77777        III  N   N OOOOO
// P   P D   D     2 4  4      3    7          I   NN  N O   O
// PPPP  D   D  222  44444  333    7           I   N N N O   O
// P     D   D 2        4      3  7     ..     I   N  NN O   O
// P     DDDD  22222    4  3333  7      ..    III  N   N OOOOO
//==============================================================================

//==============================================================================
// Program:      PD2437.ino
// Author:       Pete Willard
// Version:      0.01
// Target:       328p IDE 1.03
// Date:         2013/01/27
// Time:         12:00:18
// Notes:

// This program is free software: you can redistribute it and/or modify
// it under the terms of the GNU General Public License as published by
// the Free Software Foundation, either version 3 of the License, or
// (at your option) any later version.

// This program is distributed in the hope that it will be useful,
// but WITHOUT ANY WARRANTY; without even the implied warranty of
// MERCHANTABILITY or FITNESS FOR A PARTICULAR PURPOSE.  See the
// GNU General Public License for more details.

// You should have received a copy of the GNU General Public License
// along with this program.  If not, see <http://www.gnu.org/licenses/>.

// Reference: "nautes Tech Blog", "David Croft @ davidc.net"
//==============================================================================

//=====[ INCLUDE ]==============================================================
#include stdlib.h
#include Wire.h
//=====[ CONSTANTS ]============================================================
#define   DEBUG     1   // 0 = debugging disabled, 1 = enabled
// Address of PCF8574 IC on TWI bus is address 0100xxx (0x20)
// while the PCF857A address is 0111xxx. (0x38)
#define IO_ADDR (0x20)

//=====[ PINS ]=================================================================
int Led = 13;  // Not used
// Connected to PD2437 directly
int PA0 = 2;   // Address 0 (pin 9)
int PA1 = 3;   // Address 1 (pin 8)
int PA2 = 4;   // Address 2 (pin 7)
//
int WR = 7;   // Write (pin 7)
int CE = 5;   // Chip Enable (pin 6)
int RST = 6;  // Reset (NEG, pin 11)
//=====[ VARIABLES ]============================================================
char messagebuffer[21];

//=====[ SETUP ]================================================================
void setup()                    // run once, when the sketch starts
{
	Serial.begin(9600);
	Wire.begin();        // initialize the I2C/TWI interface

	// Setup pins for PD2437
	pinMode(PA0, OUTPUT);
	pinMode(PA1, OUTPUT);
	pinMode(PA2, OUTPUT);
	pinMode(WR, OUTPUT);
	pinMode(CE, OUTPUT);
	pinMode(RST, OUTPUT);

	// Reset PD2437
	digitalWrite(CE, HIGH);
	digitalWrite(WR, HIGH);
	digitalWrite(RST, LOW);
	digitalWrite(RST,HIGH);
	AsciiMode();
}
//==============================================================================

//=====[ LOOP ]=================================================================
void loop()                     // run over and over again
{

	// Can do this...
	char messagebuffer[] = "  Temperature: 68F  ";
	ClearDisplay();
	ScrollDisplay(messagebuffer);
	delay(1000);

	// Random Length String with INT value added
	int n = 34;
	sprintf(messagebuffer,"   Humidity: %2d%%  ",n);
	ClearDisplay();
	ScrollDisplay(messagebuffer);
	delay(1000);

}

//==============================================================================
//=====[ SUBROUTINES ]==========================================================
//==============================================================================

void CommandMode(){
	digitalWrite(PA2, LOW);  // enable command mode
}
//==============================================================================

void AsciiMode(){
	digitalWrite(PA2, HIGH);  // enable ASCII mode
}
//==============================================================================

void TogglePin(char bitpin) {
	digitalWrite(bitpin,!digitalRead(bitpin));
}
//==============================================================================

void PulsePin(char bitpin) {
	TogglePin(bitpin);
	TogglePin(bitpin);
}
//==============================================================================

void ClearDisplay() {
	CommandMode();
	PutChar(0, 0x83);
	delay(100);
	AsciiMode();

}

//==============================================================================
// Note: This looks funny because it reads the buffer from right to left
// Blame the display...  :-P

void WriteDisplay(char *input) {
	for (int i=0; i<4; i++) {
		PutChar(i, input[3-i]);
	}
	input = "";
}
//==============================================================================

void SetByte(int ch) {
	// Use TWI output Mode to Write to DATA BUS PINS on PD243x
	Wire.beginTransmission(IO_ADDR);
	Wire.write(ch);
	Wire.endTransmission();
}
//==============================================================================
// set address for PD243x

void SetAddr(int adr) {
	digitalWrite(PA0, (adr&0x1));
	digitalWrite(PA1, (adr&0x2));
}
//==============================================================================
// Main Character writing routine

void PutChar(int pos, int ch) {
	SetByte(ch);			// Pre-set the 8 bit data bus
	SetAddr(pos);			// pre-set the address bus
	digitalWrite(CE, LOW);	// Enable Display
	PulsePin(WR);  			// Read inputs and display it
	digitalWrite(CE, HIGH);	// Disable Diplay
}
//==============================================================================

void ScrollDisplay(char *ascii) {
	char buffer[4];
	int i = 0;
	boolean blank;
	while(ascii[i] != 0){
		blank = false;
		for (int ii = 0; ii<4; ii++) {
			if ( !blank && ascii[i + ii] == 0 ) {
				blank = true;
			}

			if ( blank ) {
				buffer[ii] = ' ';
			}
			else {
				buffer[ii] = ascii[i + ii];
			}
		}
		buffer[5]=0;
		WriteDisplay(buffer);
		delay(250);
		i++;
	}
}
No updates? I blame writers block…

Yeah, that’s the ticket.

So where am I as I start 2013.  Well, My Arduino based weather thingy is basically working.  The rain counter still dead… the now obsolete Maxim DS2423 seems a bad design choice now.  There must be a better way to keep track of the tipping rain bucket ( 5o tips per inch) that is non-volatile for those power outage times.

My Arduino based “make your own work bench tool” project is sort of stalled. Though I did find a neat oversize retro cabinet to put it in. (So 1980’s)

I’ll close up this update by sharing an old project… the Live For Speed Outgauge Bus Arduino interface (gear and RPM meter).

PC Network UDP to Serial conversion:  “PC CODE” and the Schematic.

Arduino Code: (pre-IDE 1.0)

 //----[ OutGaugeBus ]------------------------------------------------------
 // Name : OGBUS.PDE
 //-------------------------------------------------------------------------
 // Purpose : Receive serial commmands from "Live For Speed" INSIM OUTGAUGE
 // : Client and then display real-time dashboard information
 // : on Arduino based output devices, such as LED's.
 // : Live For Speed References:
 // : LFS/DOCS/INSIM.TXT
 // : http://en.lfsmanual.net/wiki/InSim_Tutorials
 // : http://www.brunsware.de/insim/
 // : See Also: http://www.lfs.net/
 //-------------------------------------------------------------------------
 // Date : 25 Oct, 2007 ( Started as a Parallax SX28 project )
 // Version : 2.11
 // Modified: 12/22/2010 11:30:34 AM
 // Author : Pete Willard
 // :
 //Additional:
 // Credits : * Mike McRoberts - Earthshine Design -
 // : Arduino Starter Kit PDF
 // :
 // : * Hacktronics - http://www.hacktronics.com/Tutorials
 // :
 // : * Arduino ShiftOut tutorial
 // :
 // : To keep code "recognizable", available references were used
 // : and changed very little from reference sources listed above.
 //-------------------------------------------------------------------------
 // Notes : Includes using a 74HC595 Shift Register for the Bar Graph
 // : and discrete 7-segment display for gear indicator
 // :
 // : Commands come from OGBUS.EXE (DevC++ UDP Client) and convert
 // : INSIM OUTGAUGE data into serial packet data for Arduino
 // : INSIM Client Software will send ALL vaalues every update
 // : but can send as little as Clear Command "C0"
 // :
 // : Expansion:
 // : With a little creative wiring, it would be possible to
 // : daisy chain multiple serial Arduino boards or if USB is
 // : used, multiple OGBUS clients can be run at one time
 // :
 // : Command Examples:
 // : (Comma Separated Values) Any Order up to 24 Characters
 // : Format: <command></command>,<command></command>...
 // : C0 = Clear All Outputs
 // : G0-G8 = Gear Indicator
 // : R0-R8 = RPM Bargraph
 // : S0|S1 = Shift Light Pin On|Off (binary)
 // : P0|P1 = Pit Limiter Pin On|Off (binary)
 // :
 //-------------------------------------------------------------------------

//----[ Variables ]--------------------------------------------------------
 const int buffsize = 25; // Buffer Size
 char buffer[buffsize]; // Incoming Serial Data Buffer
 int debug = 0; // Set to NON-ZERO to test with Serial Monitor
 int ledCount = 8; // The number of LEDs in the Bar Graph LED
 //-------------------------------------------------------------------------
 // Seven segment LED layout for the Gear Indicator
 // Arduino pins must be sequential
 int GIstartpin = 2;
 // Arduino pin: 2,3,4,5,6,7,8
 byte seven_seg_digits[9][7] = { { 0,0,0,0,1,0,1 }, // = R
 { 0,0,1,0,1,0,1 }, // = N
 { 0,1,1,0,0,0,0 }, // = 1
 { 1,1,0,1,1,0,1 }, // = 2
 { 1,1,1,1,0,0,1 }, // = 3
 { 0,1,1,0,0,1,1 }, // = 4
 { 1,0,1,1,0,1,1 }, // = 5
 { 1,0,1,1,1,1,1 }, // = 6
 { 0,0,0,0,0,0,0 }, // = 7 (blank)
 };
 // a b c d e f g ------> LED segment
 //-------------------------------------------------------------------------
 // Bargraph Values for 8 LED Bargraph
 // Only 8 values of BYTE are needed to light the 8 bargraph LED's
 // sequentially
 // NOTE: Most Bargraph LED's are "10 unit" so I have bottom 2 and top 2
 // LED's tied together.
 // Part Number used: AVAGO "HDSP-4832" 3-Green 4-Yellow 3-Red
 // Mouser Part Number: 630-HDSP-4832
 // The Shift Register lowest outputs start with Green Anodes of the
 // Bargraph.
 //
 byte bargraph[9] = {0x00,0x01,0x03,0x07,0x0F,0x1F,0x3F,0x7F,0xFF};
 //-------------------------------------------------------------------------
 // LED PINS - optional since we are low on pins
 int shiftlight = 12;
 //int pitlimit = 13; // Pick one
 //int lowfuel = 13;
 //-------------------------------------------------------------------------
 // 74HC595 Pin Setup
 int latchPin = 9; // Pin connected to ST_CP (12) of 74HC595
 int clockPin = 10; // Pin connected to SH_CP (11) of 74HC595
 int dataPin = 11; // Pin connected to DS (14) of 74HC595

//----[ SETUP ]-----------------------------------------------------------
 void setup() {
 // Speed needs to match INSIM - Outgauge Client Configuration setting
 Serial.begin(19200);
 Serial.flush();

// Set all pins to Outut Mode
 int a;
 for(a=0;a < 13;a++){ pinMode(a, OUTPUT); 
 } 
} 

//----[ MAIN LOOP ]------------------------------------------------------ 
void loop()  { 
// Mike McRoberts serial input command routines 
// from the "Serial Controlled Mood Lamp" example 
// in Arduino Starter Kit Manual from Earthshine Design 
if (Serial.available() > 0) {
 int index=0;
 delay(10); // let the buffer fill up
 int numChar = Serial.available();
 if (numChar>buffsize) {
 numChar=buffsize;
 }
 while (numChar--) {
 buffer[index++] = Serial.read();
 }
 splitString(buffer); // Process Serial Packet
 }
 }

//----[ SubRoutines ]----------------------------------------------------

void splitString(char* data) {
 // also from "Serial Controlled Mood Lamp" example

if (debug) {
 Serial.print("Data entered: ");
 Serial.println(data);
 }

// Sequentially De-Tokenize the Serial Commands received
 char* parameter;
 parameter = strtok (data, " ,");
 while (parameter != NULL) {
 // Pass result to parseCMD for each Command received
 parseCMD(parameter);
 // remove processed commands from the list
 parameter = strtok (NULL, " ,");
 }

// Clear the text and serial buffers
 for (int x=0; x<buffsize; x++) {
 buffer[x]='\0';
 }
 Serial.flush();
 }

//=======================================================================
 void parseCMD(char* data) {
 // Flexible, easily expanded Command Parser
 // based on "Serial Controlled Mood Lamp" example
 // *** Marvelous coding by Mike MCRoberts

//--[gear]---------------------------------------
 if ((data[0] == 'G') || (data[0] == 'g')) {
 // Have command, now get Argument "value" while removing whitespace
 int ArgVal = strtol(data+1, NULL, 10);
 // then limit the results to what we expect for this command
 ArgVal = constrain(ArgVal,0,8);
 sevenSegWrite(ArgVal);

if (debug) {
 Serial.print("Gear is set to: ");
 Serial.println(ArgVal);
 }
 }

//--[shift light]--------------------------------
 if ((data[0] == 'S') || (data[0] == 's')) {
 int ArgVal = strtol(data+1, NULL, 10);
 ArgVal = constrain(ArgVal,0,1);
 digitalWrite(shiftlight,ArgVal);

if (debug) {
 Serial.print("SHIFT is set to: ");
 Serial.println(ArgVal);
 }
 }

//--[reset]--------------------------------------
 if ((data[0] == 'C') || (data[0] == 'c')) {
 int ArgVal = strtol(data+1, NULL, 10);
 ArgVal = constrain(ArgVal,0,1);

sevenSegWrite(8);
 shiftWrite(0x00);

if (debug) {
 Serial.print("Clear Outputs");
 }
 }

//--[rpm bar graph]-----------------------------
 if ((data[0] == 'R') || (data[0] == 'r')) {
 int ArgVal = strtol(data+1, NULL, 10);
 ArgVal = constrain(ArgVal,0,8);

shiftWrite(bargraph[ArgVal]);

if (debug) {
 Serial.print("RPM is set to: ");
 Serial.println(ArgVal);
 }
 }

} // End parseCMD Loop

//=======================================================================
 void sevenSegWrite(byte digit) {
 byte pin = GIstartpin;
 for (byte segCount = 0; segCount < 7; ++segCount) {
 digitalWrite(pin, seven_seg_digits[digit][segCount]);
 ++pin;
 }
 }
 //=======================================================================
 void shiftWrite(byte Rdata){
 // prepare the register for data
 digitalWrite(latchPin, LOW);
 // shift out the bits:
 shiftOut(dataPin, clockPin, MSBFIRST, Rdata);
 //Set the latch pin high to enable the outputs
 digitalWrite(latchPin, HIGH);
 }